Getting Started with Last Chance
Welcome to Last Chance! This guide will walk you through setting up your first unsubscribe page, customizing it to match your brand, and integrating it with your email marketing platform.
Overview
Last Chance helps you reduce unsubscribes by creating beautiful, customizable unsubscribe pages that give your subscribers options beyond just "goodbye." You can offer pause options, discount codes, and gather feedback—all while maintaining brand consistency.
Prerequisites
Before you begin, you'll need:
- A Klaviyo account with API access
- Your email templates in Klaviyo (flows, campaigns, or universal content)
- (Optional) A discount code to offer subscribers who stay
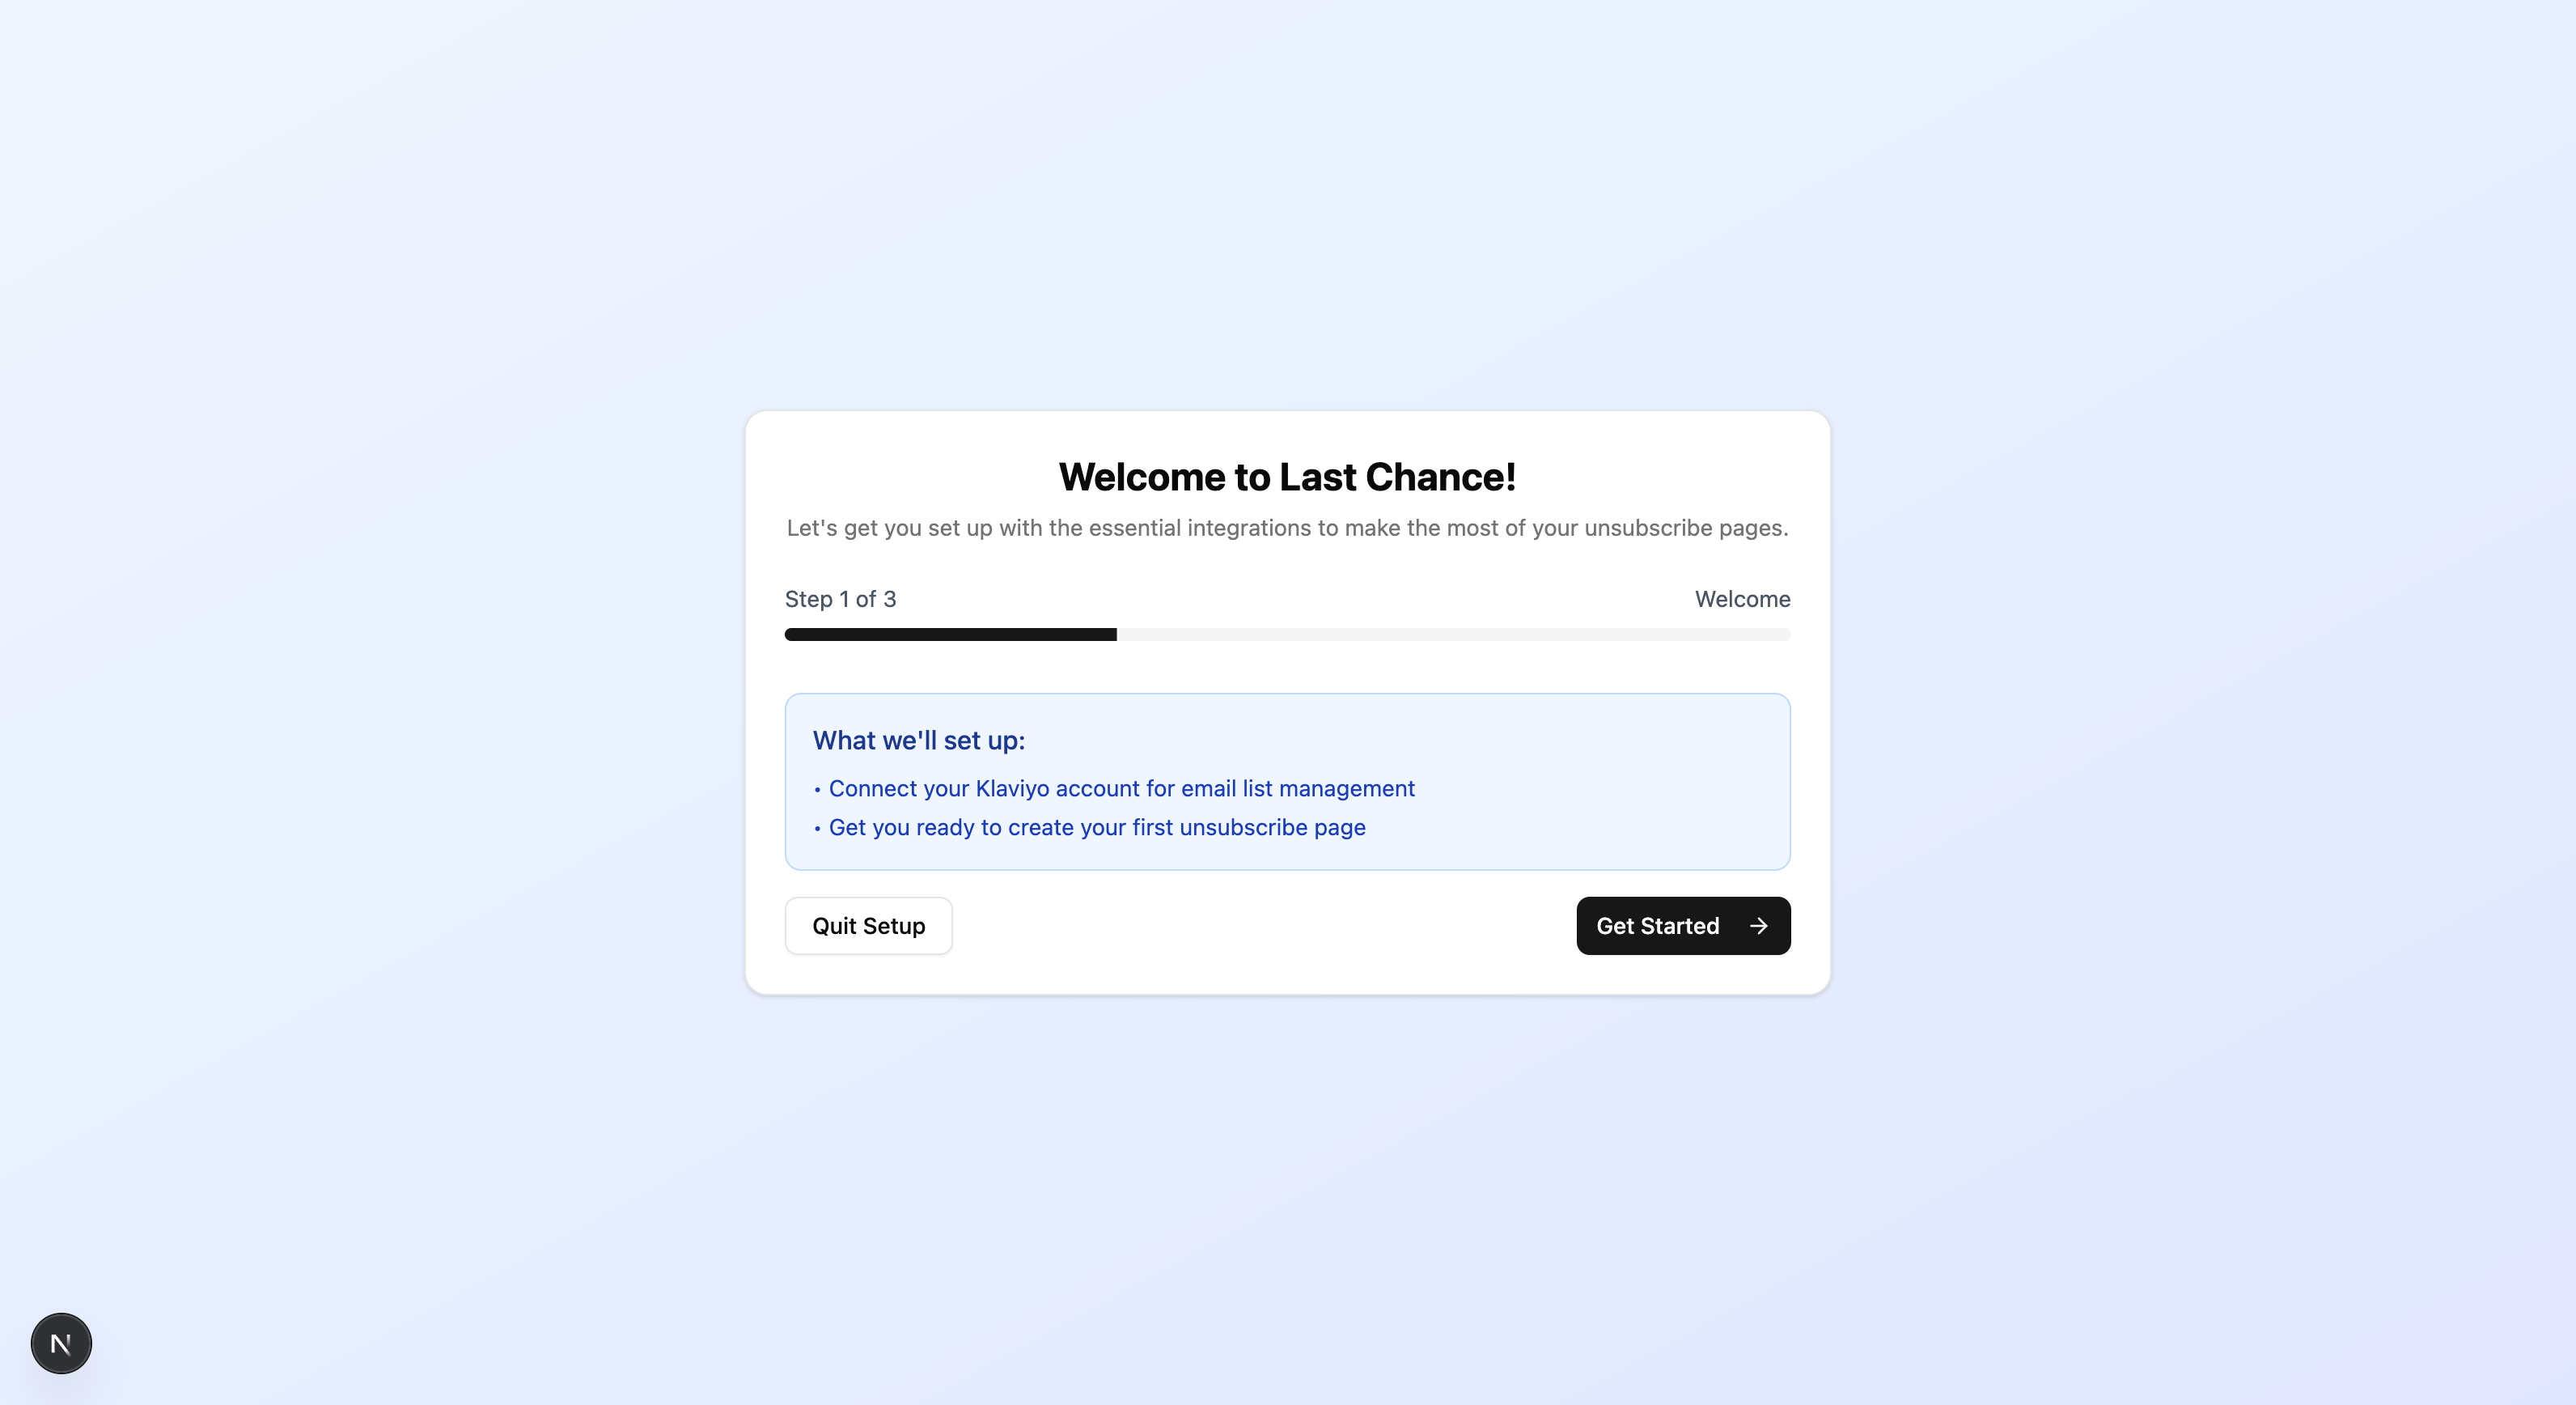
Step 1: Initial Setup Wizard
When you first log in, you'll be greeted by the Initial Setup Wizard. This guides you through connecting your essential integrations.
Connect Klaviyo
- Click Get Started to begin the setup process
- On the Klaviyo connection step, click Connect Klaviyo
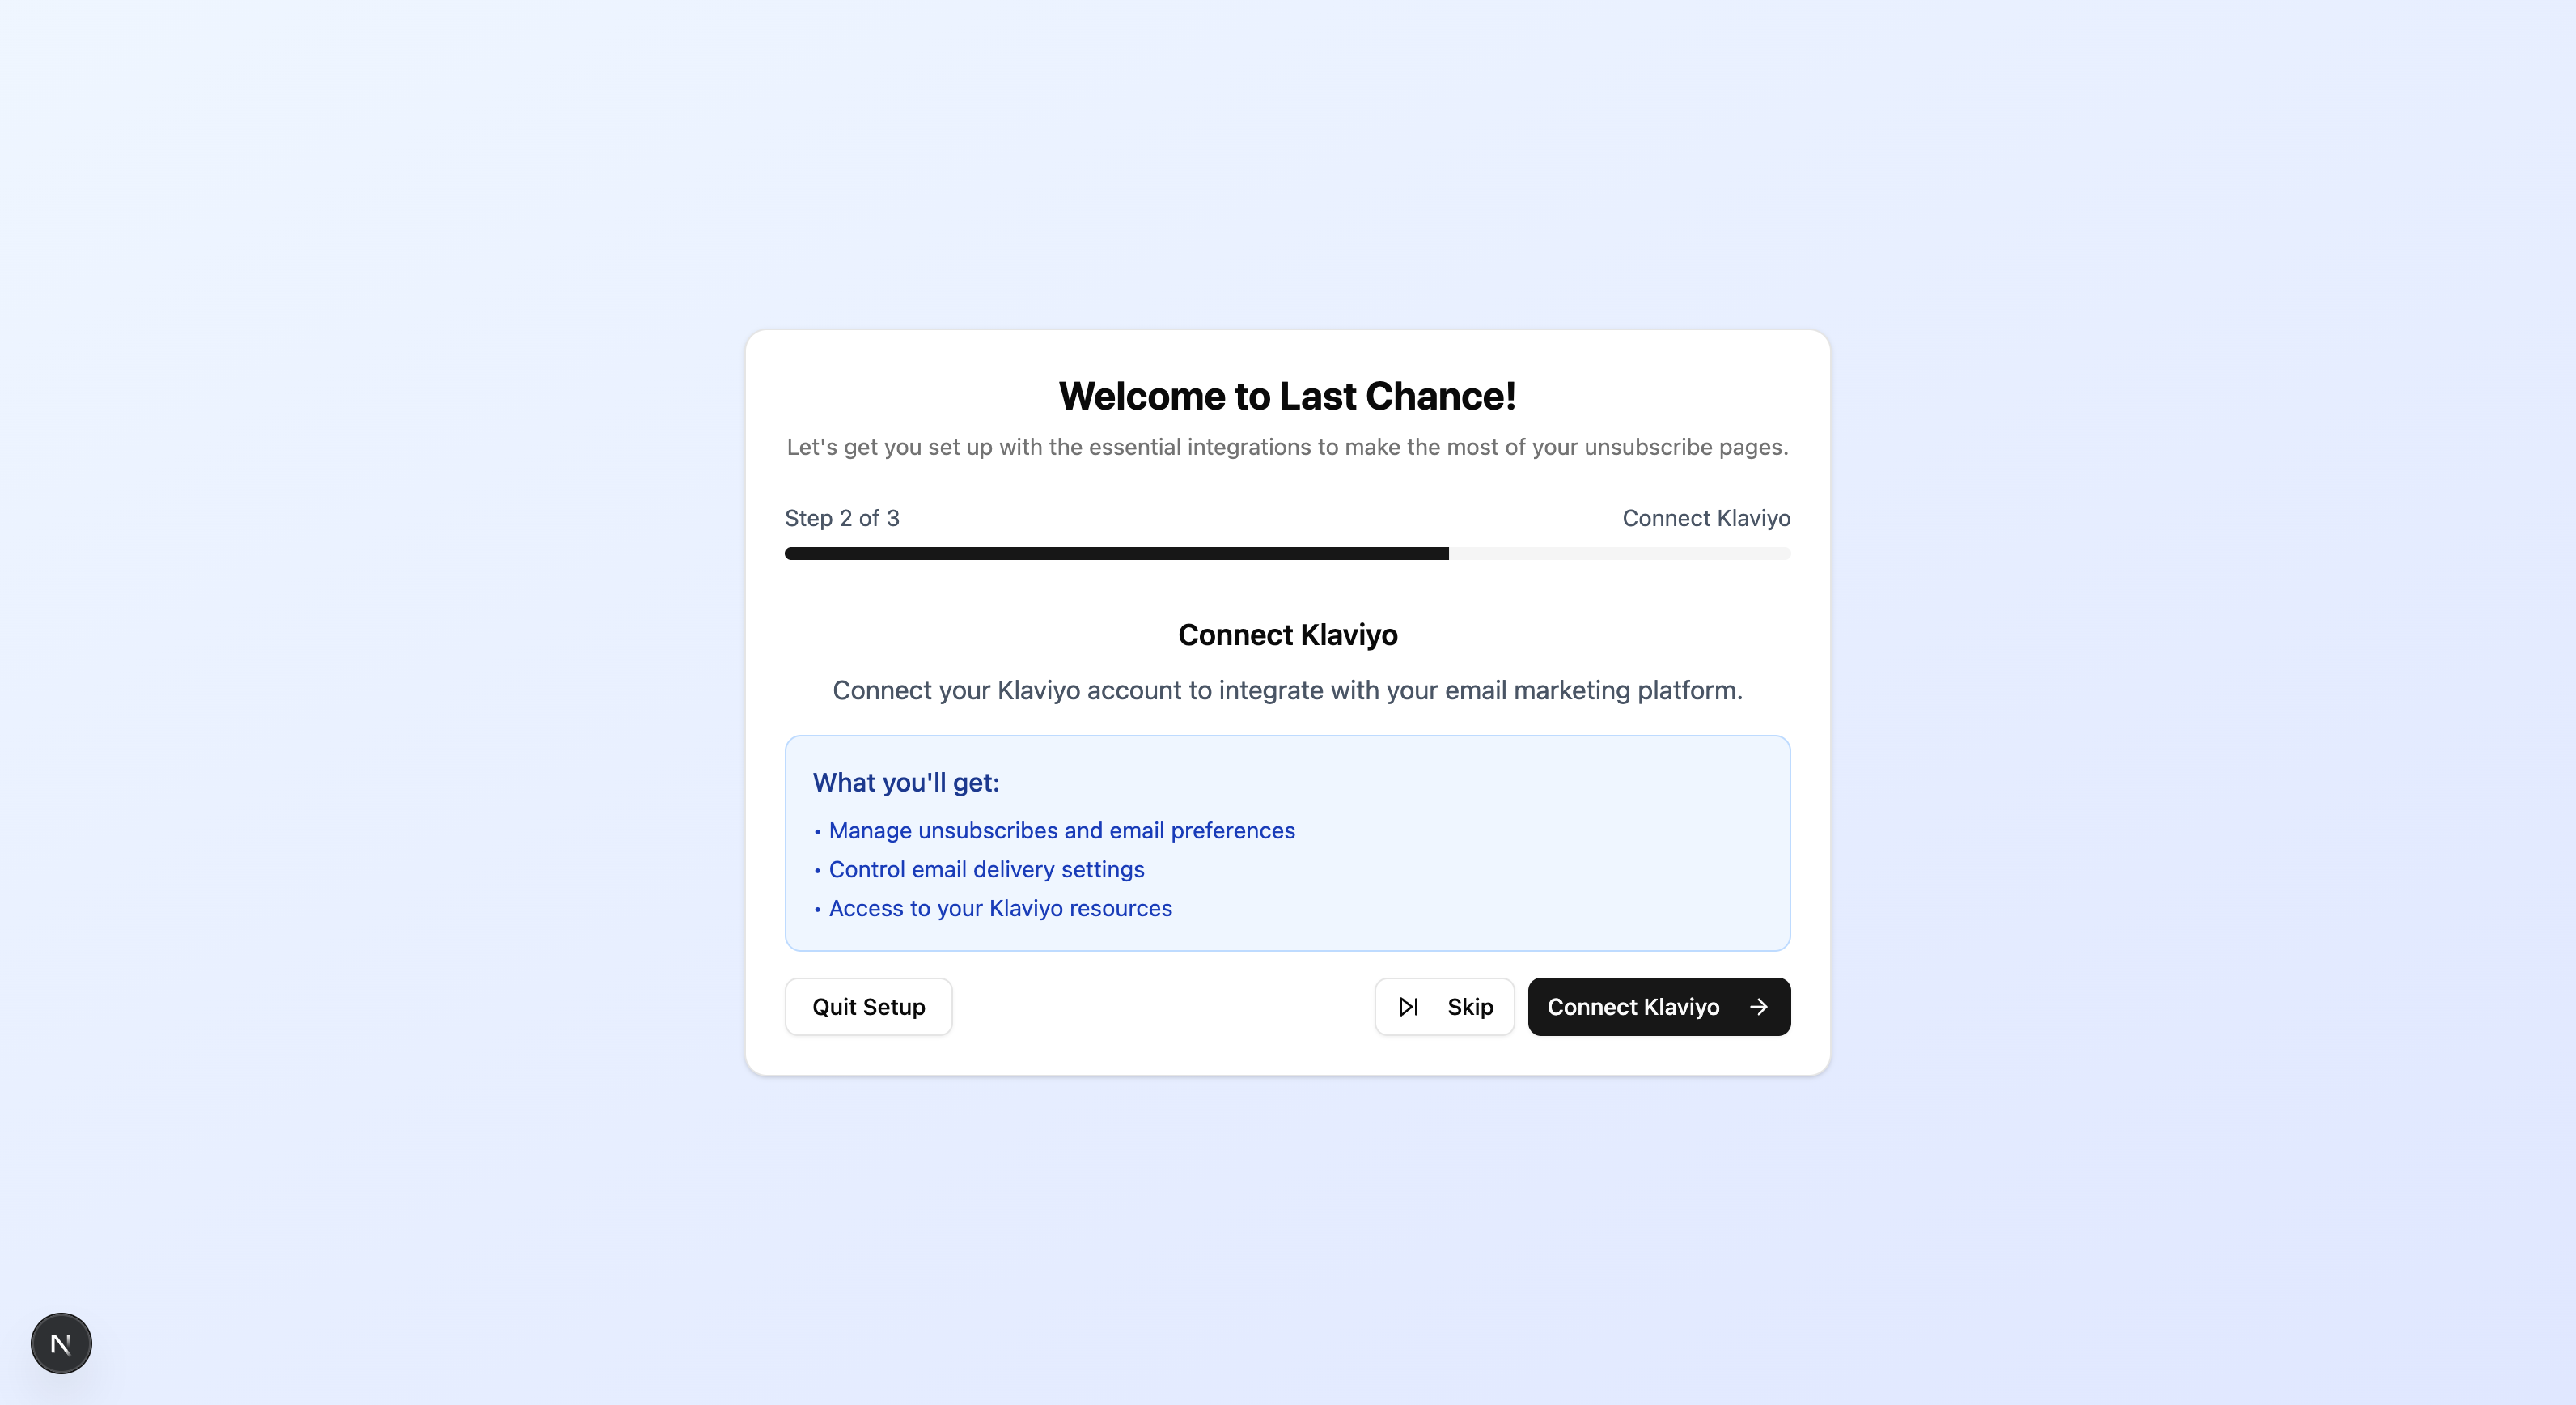
- You'll be redirected to Klaviyo to authorize the connection
- Grant Last Chance permission to access your account
- After authorization, you'll be redirected back to Last Chance
Why Klaviyo? Last Chance integrates directly with Klaviyo to:
- Manage subscription status changes
- Track profile data
- Set up Klaviyo unsubscribe hosted page for automatic redirects
- Sync your subscriber count for billing
Skip or Complete Later
If you're not ready to connect integrations, you can:
- Click Skip to move to the next step
- Click Skip Setup to skip the wizard entirely
You can always complete setup later from Settings → Email Providers.
Step 2: Create Your First Unsubscribe Page
Once setup is complete, you're ready to create your first unsubscribe page.
Navigate to Unsubscribe Pages
- From the dashboard, click Unsubscribe Pages in the left sidebar
- Click Create New Page
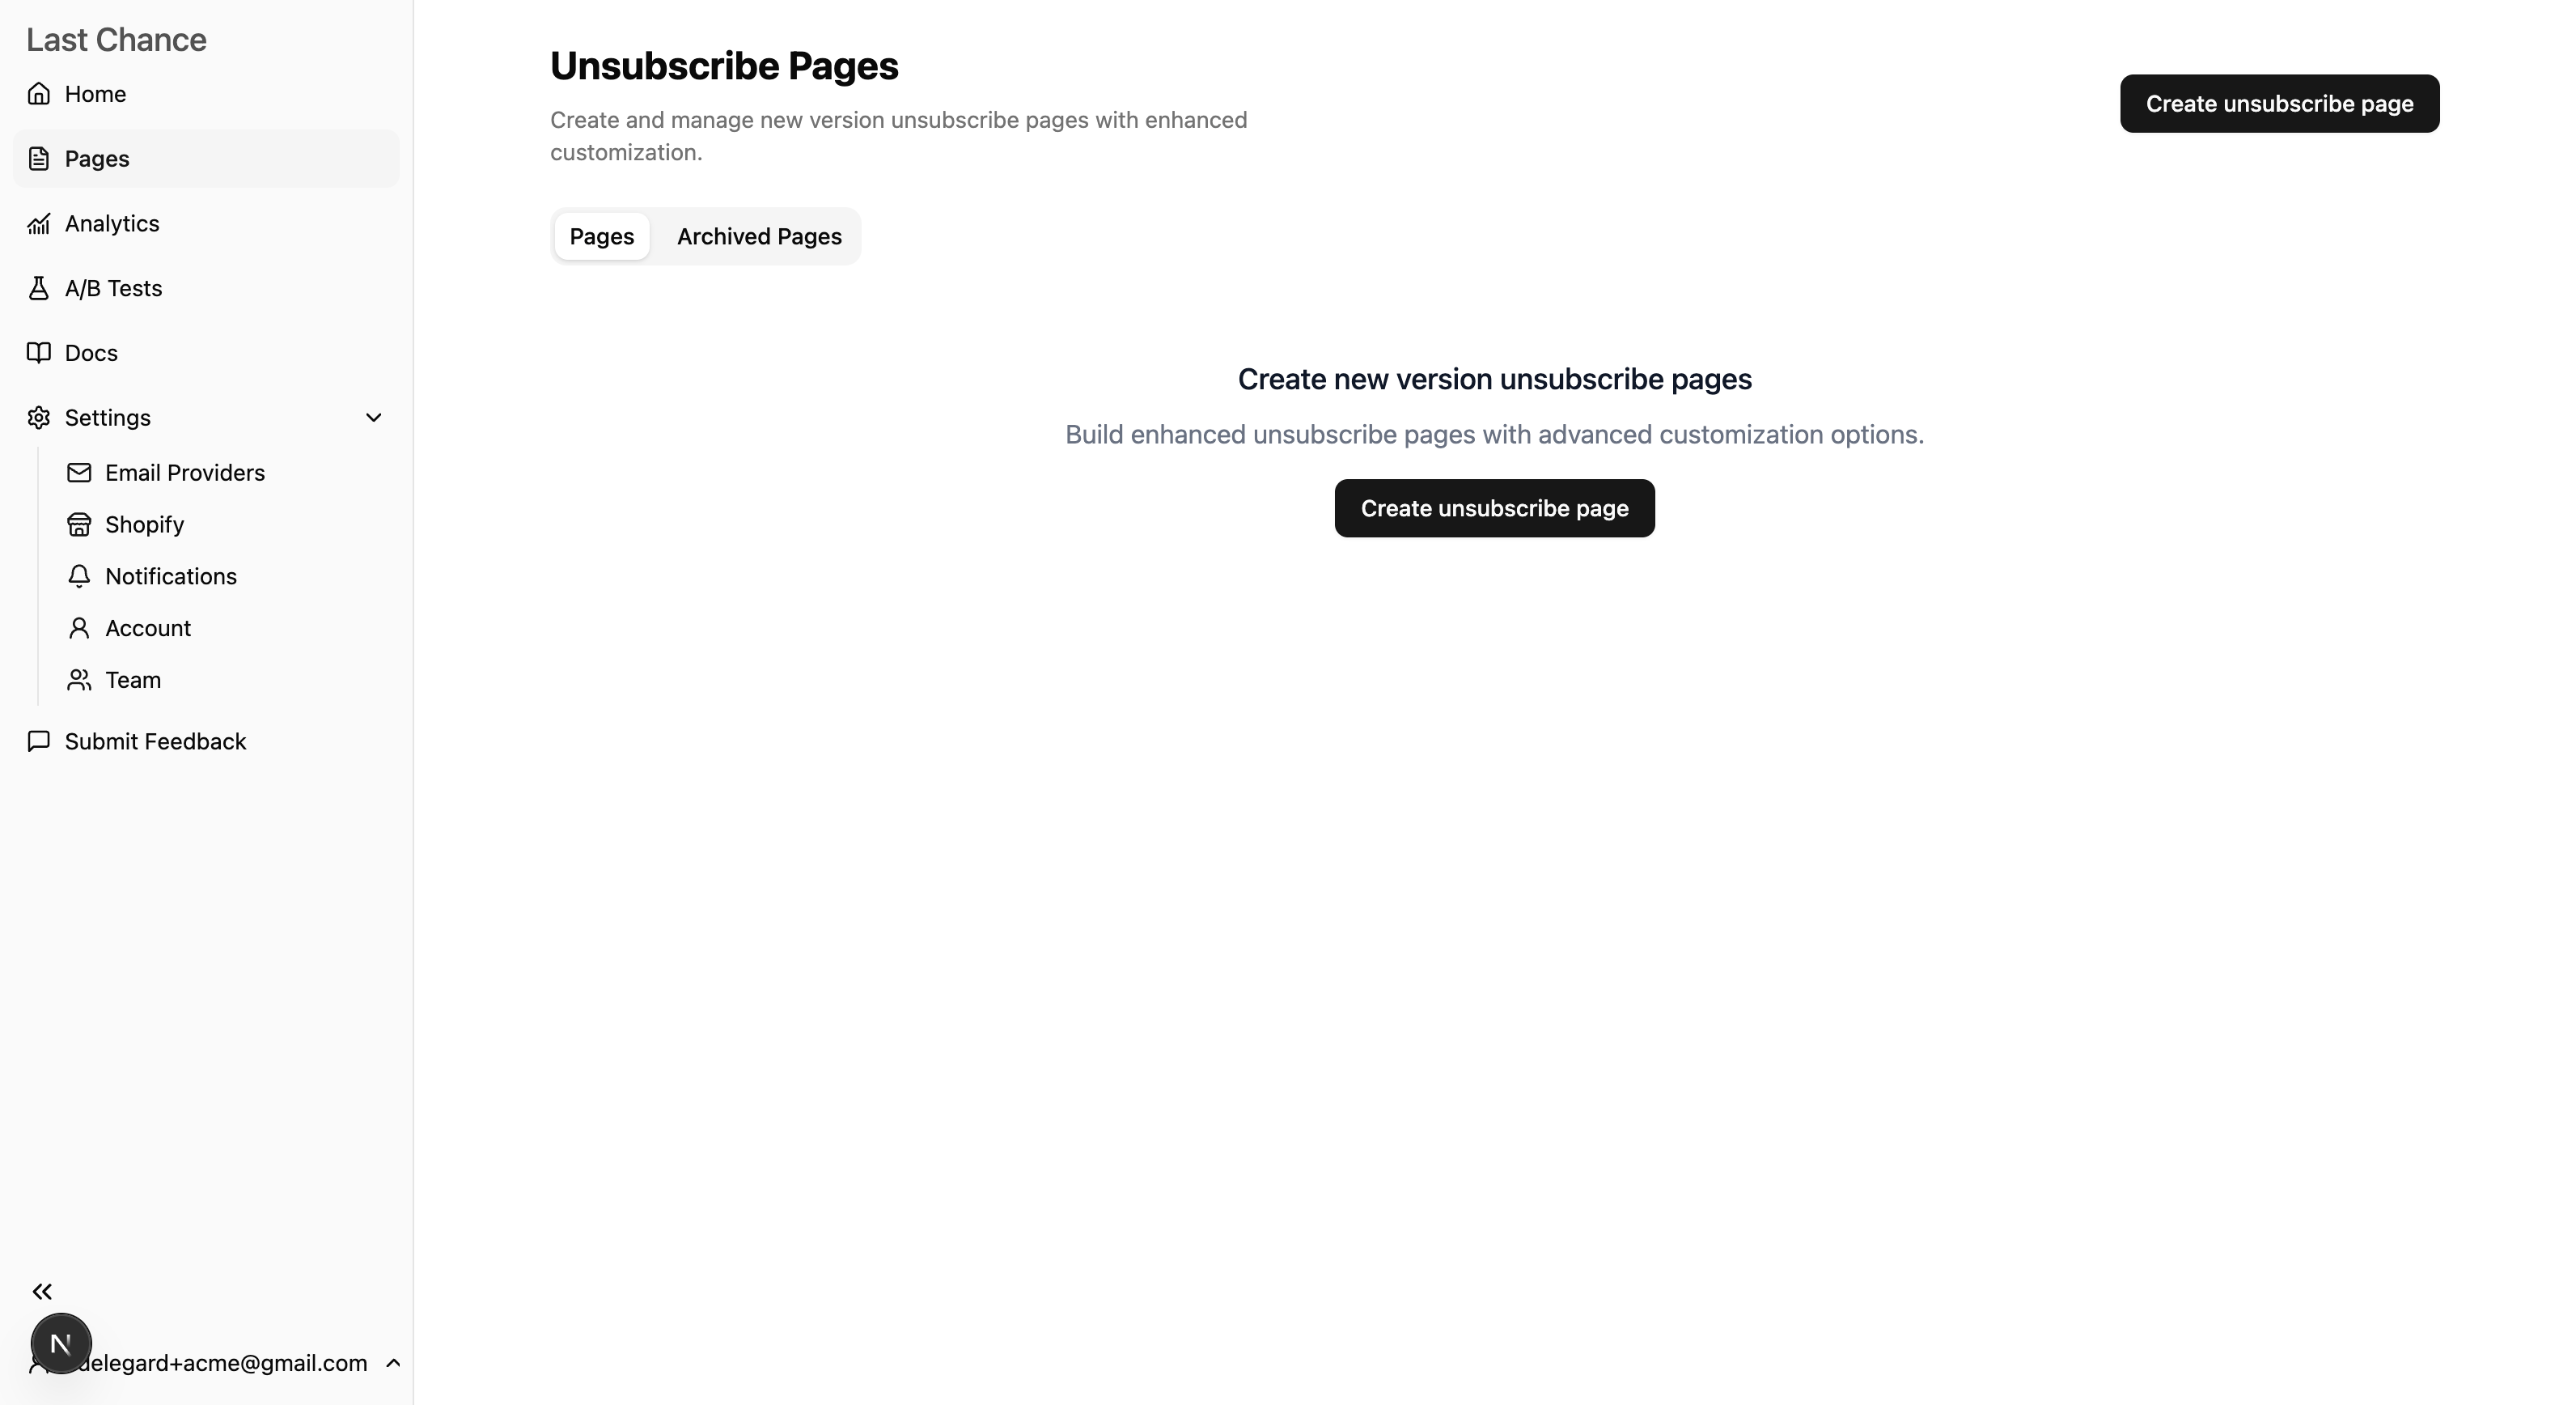
- Give your page a name (e.g., "Main Unsubscribe Page")
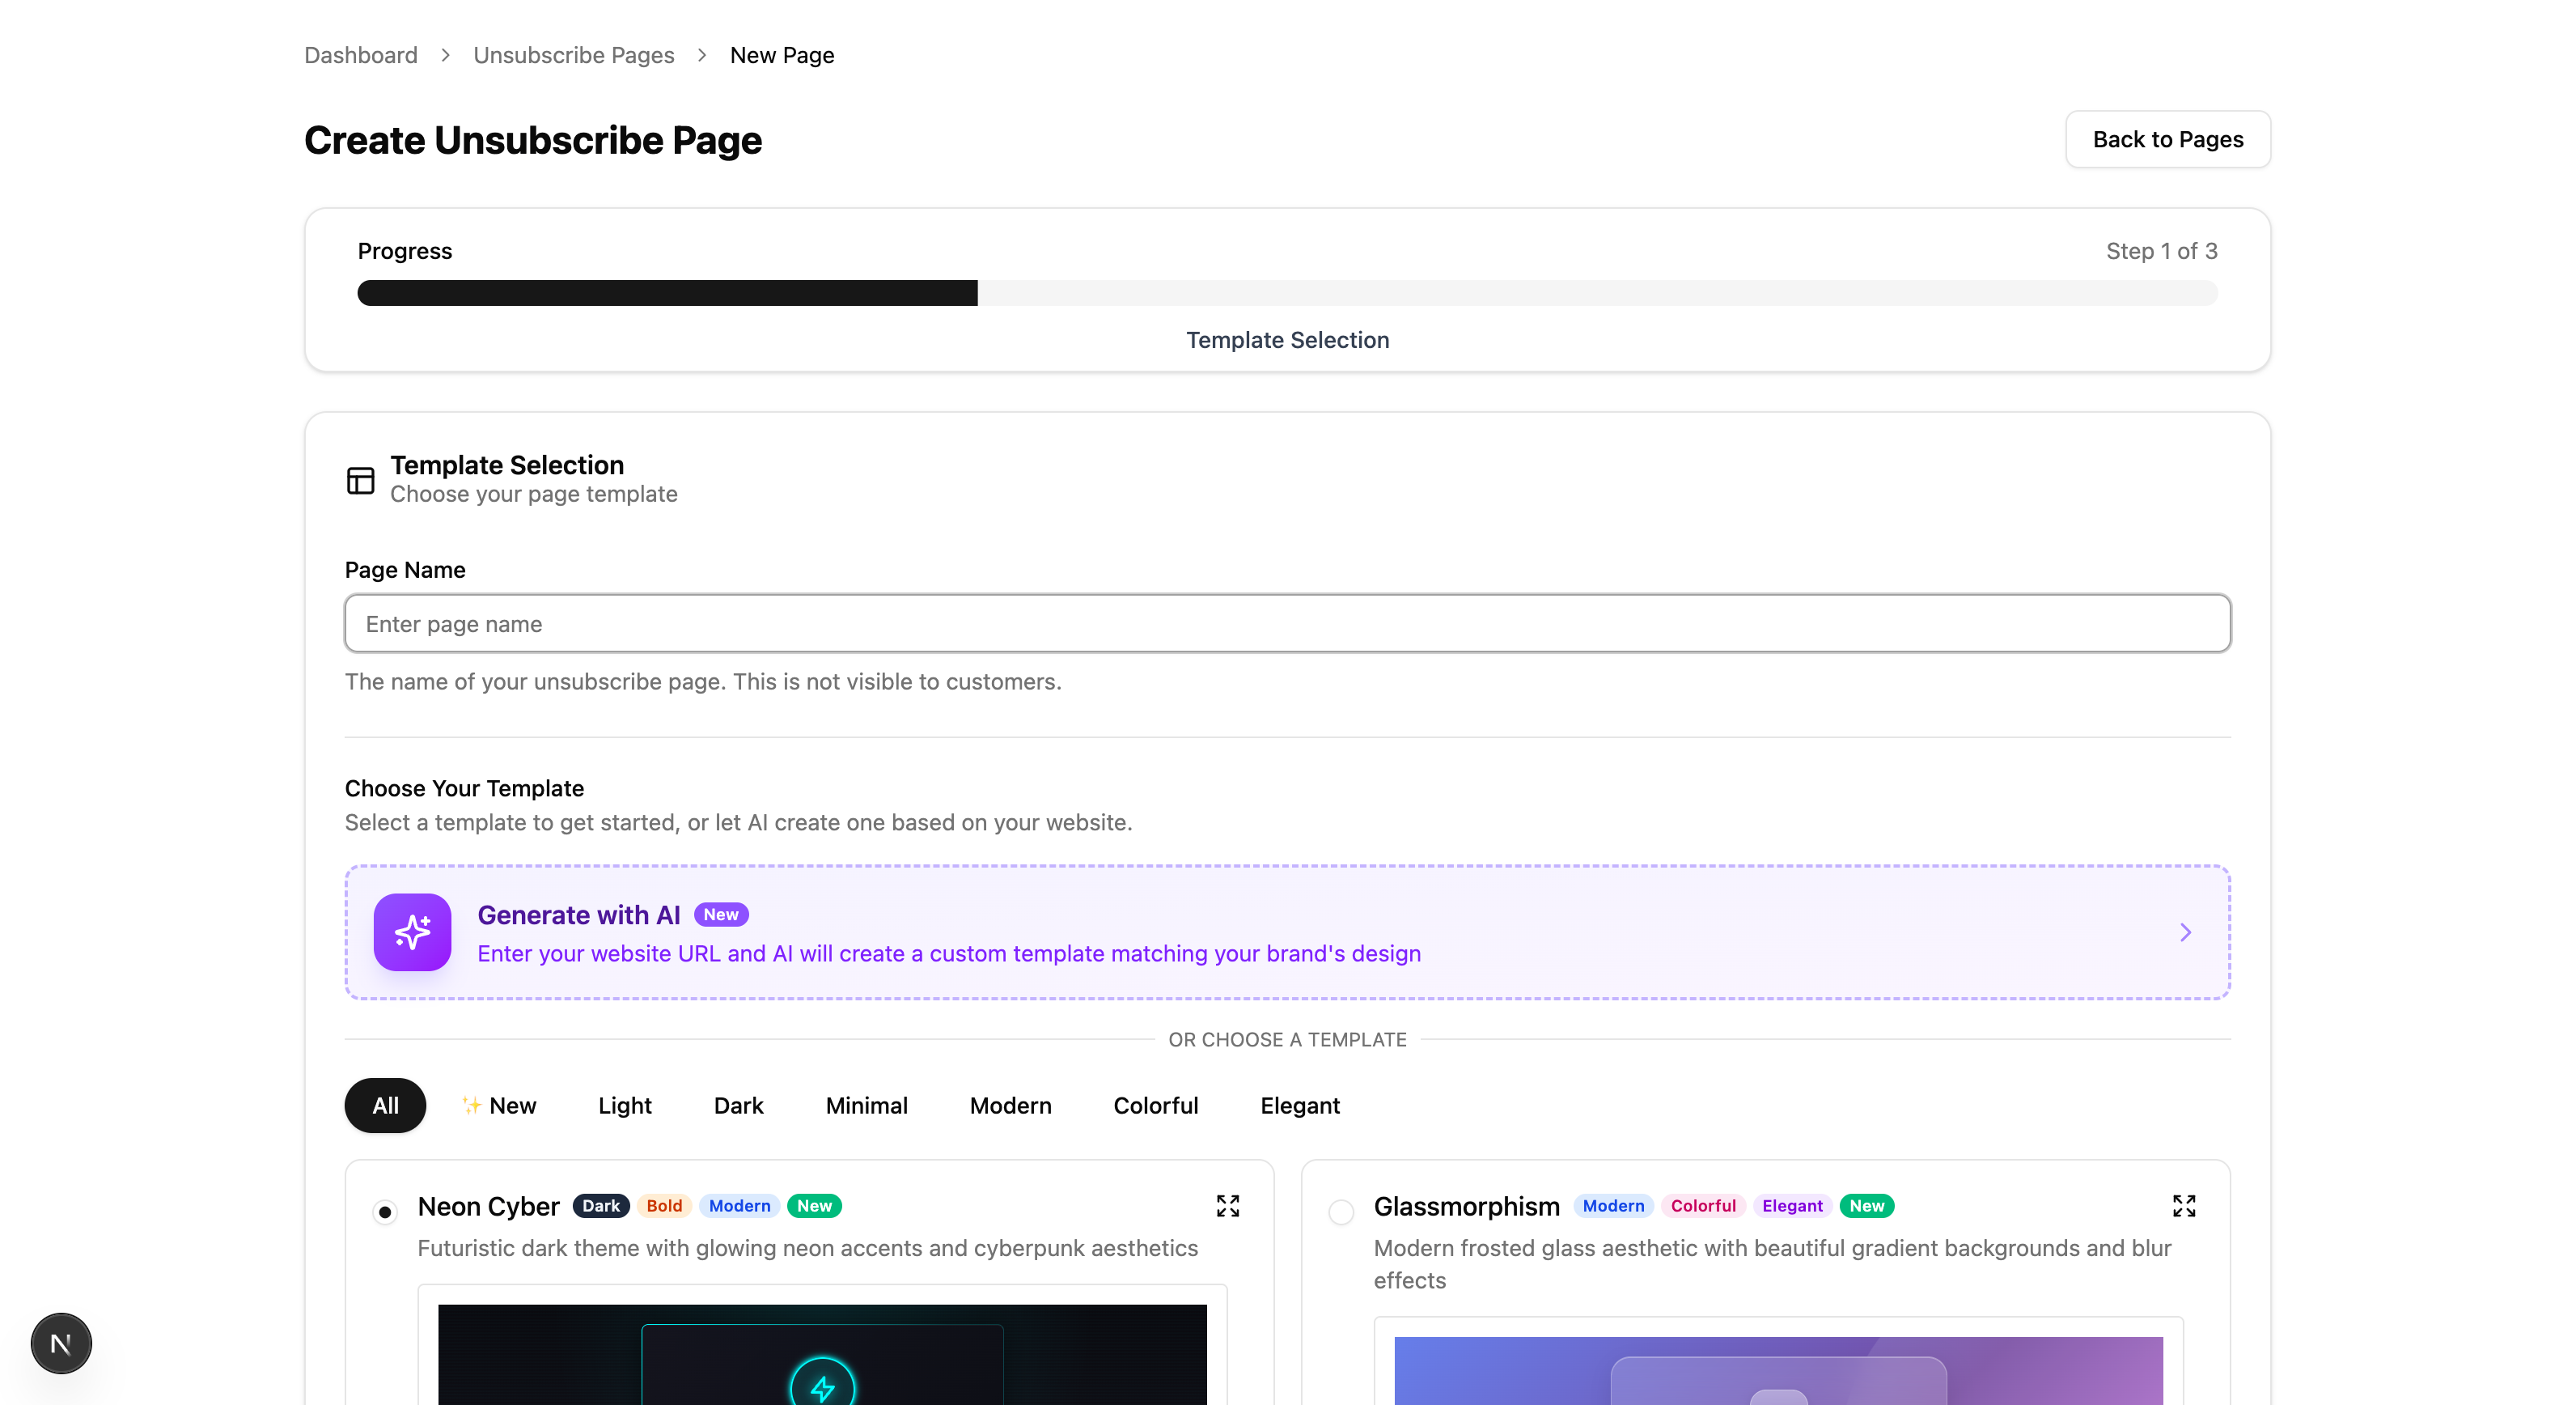
Understanding the Editor
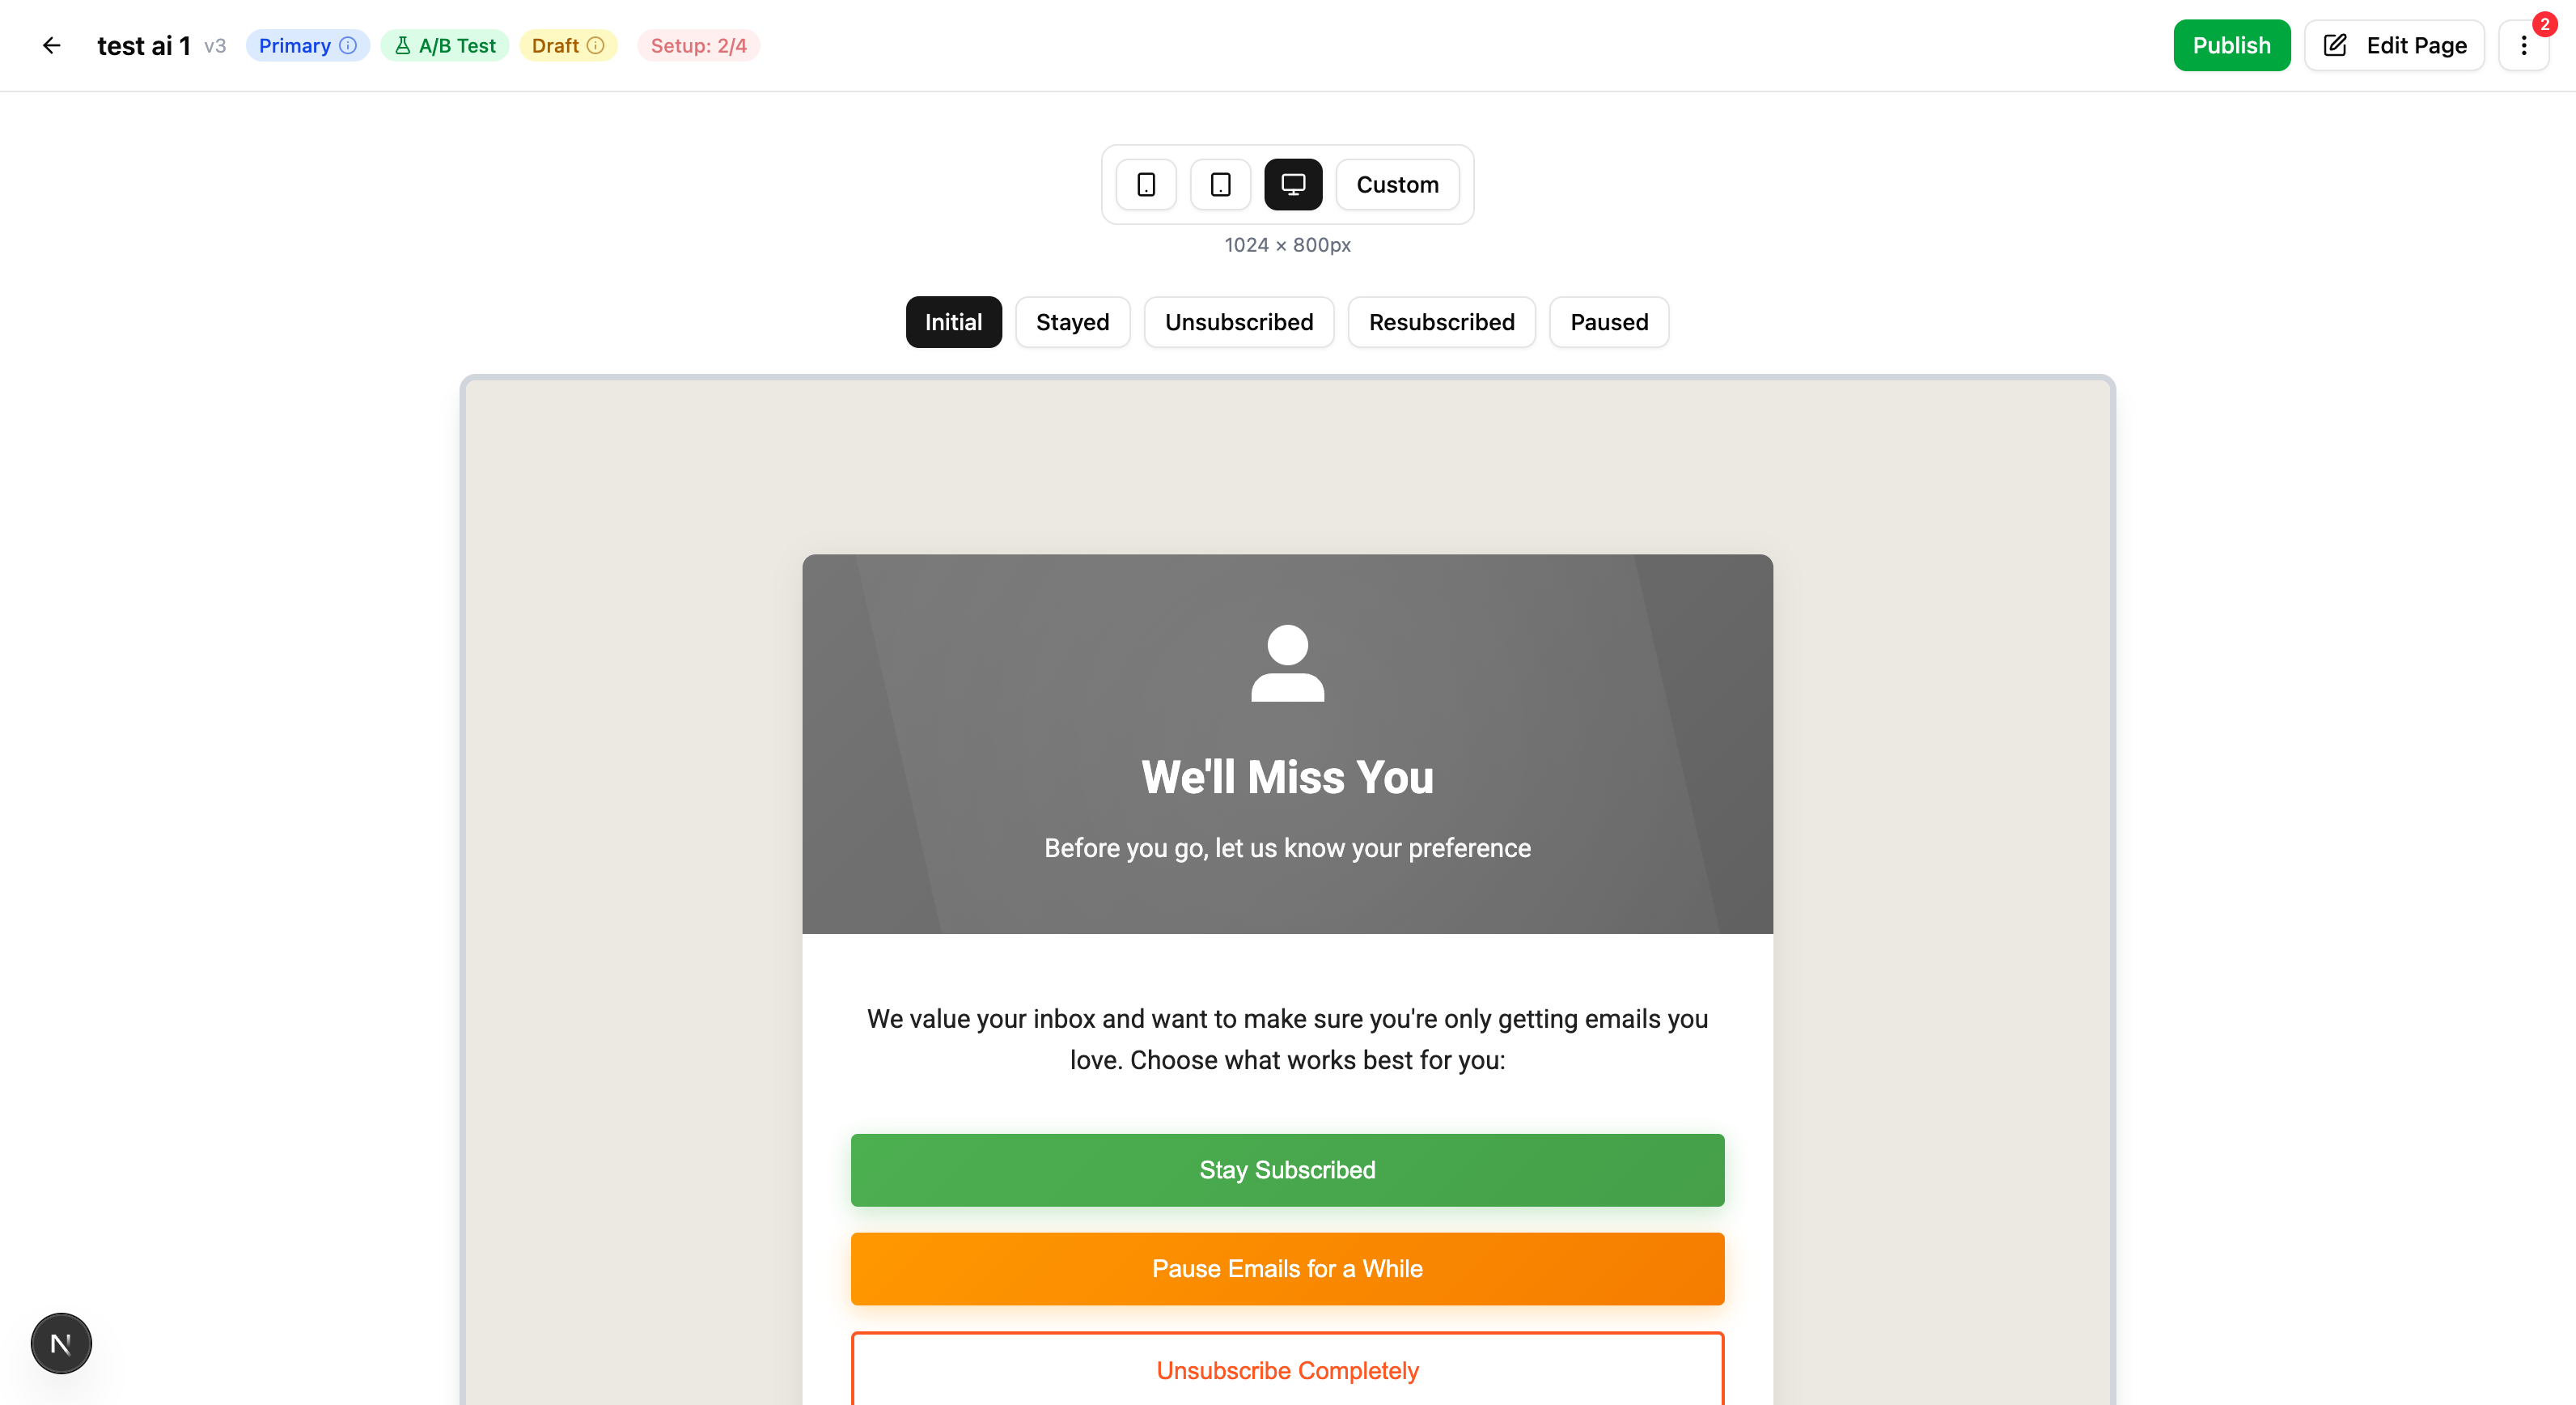
The page editor has three main areas:
| Area | Purpose |
|---|---|
| Preview Panel | See your page as subscribers will see it |
| Settings Sidebar | Configure colors, fonts, discount codes, and more |
| Visual Editor | Edit HTML/CSS directly with the GrapesJS WYSIWYG editor |
Editor Modes
You can switch between different editing modes:
- Settings Mode - Configure theme colors, fonts, discount codes, and integration settings
- Edit Page Mode - Use the visual drag-and-drop editor to modify page layout and content
- AI Assistant - Use natural language to describe changes you want to make (e.g., "Make the button blue" or "Add more spacing")
Step 3: Customize Your Page
Using the Settings Sidebar
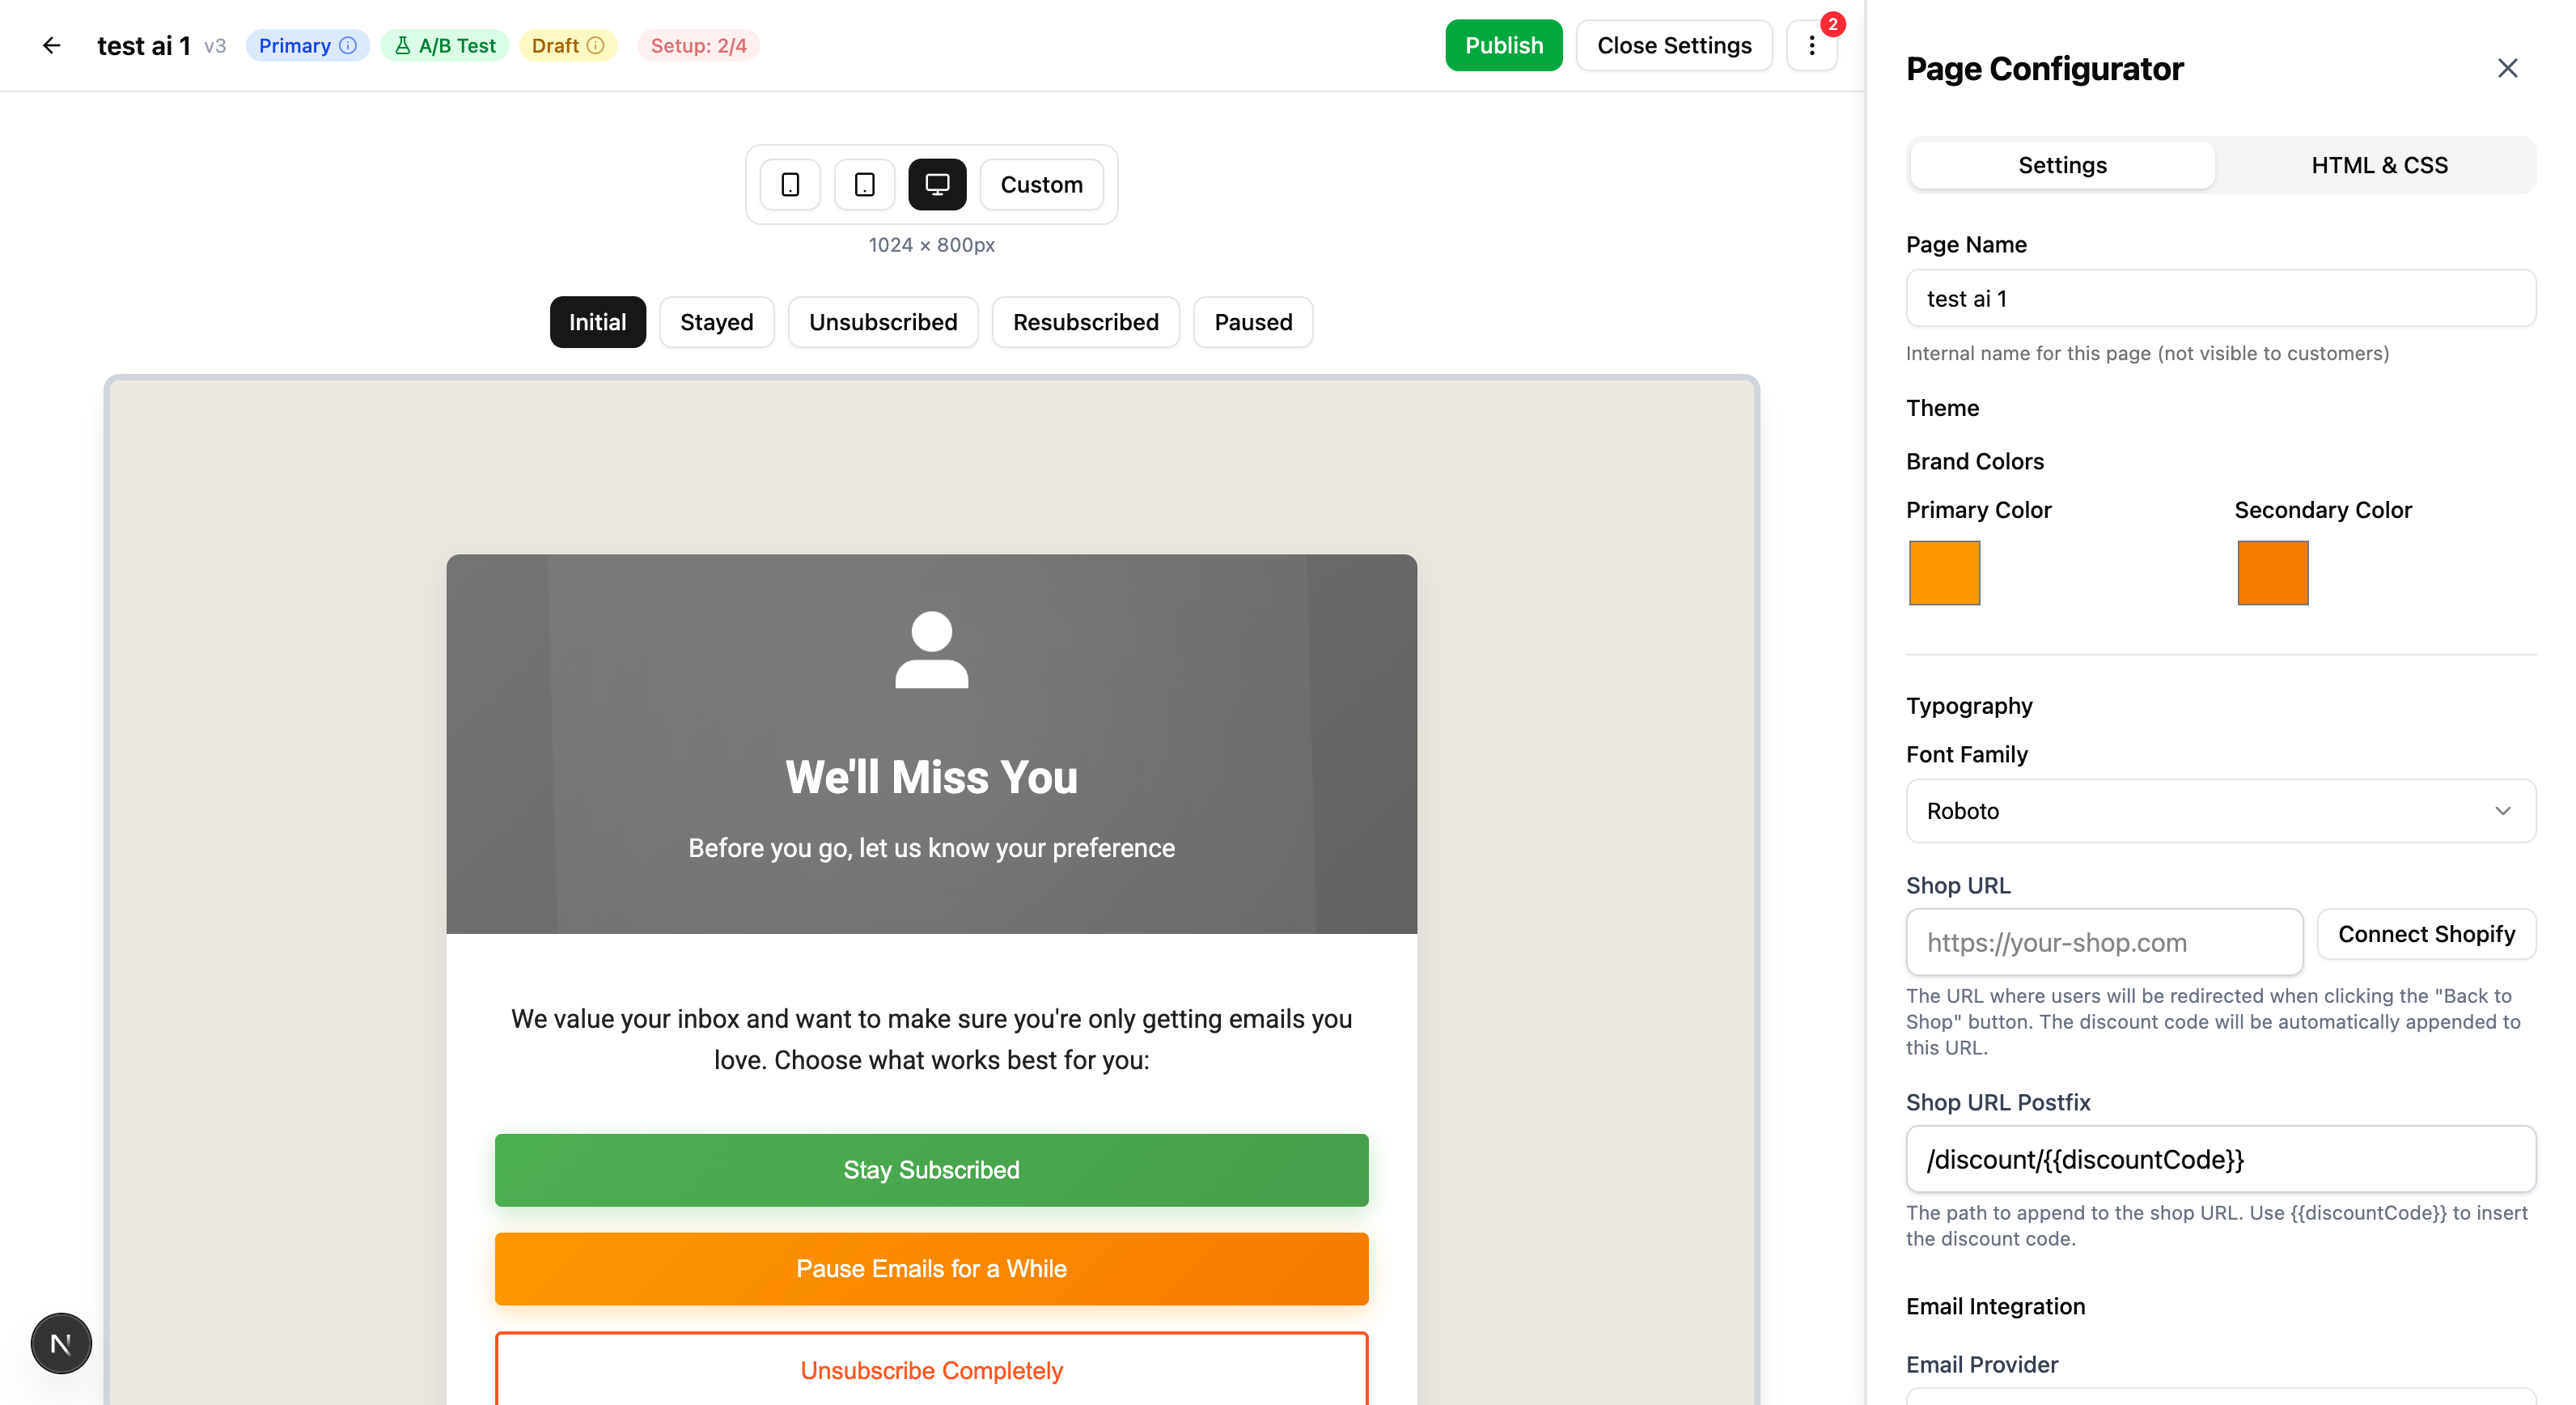
The Settings sidebar lets you customize:
Theme Configuration
- Primary Color - Main accent color for buttons and highlights
- Secondary Color - Supporting color for backgrounds and borders
- Font Family - Choose from available web fonts
- Shop URL - Link to your store for "Shop Instead" buttons
Page Content
Switch between different page states to customize:
- Initial Page - What subscribers see first
- Stay Subscribed - Confirmation when they choose to stay
- Unsubscribed - Confirmation when they unsubscribe
- Paused - Confirmation when they pause emails
Segment experiences and smart offers
In Settings mode, you can go beyond a single layout for everyone:
-
Segment experience — Create one or more named experiences, each identified by a stable key (lowercase slug: letters, numbers, underscores). An optional display label (for example, “VIP subscribers”) is shown in the editor and in analytics pickers; the key is what rules and APIs use.
-
Editing as — Use the Editing as dropdown to choose Default (canonical) or a named experience. While a named experience is selected, changes to HTML (and optional per-screen visibility) are saved as sparse overrides for that key only—the default flow stays unchanged unless you edit it under Default. Copy default → this screen or Copy default → all screens seeds overrides from the canonical page; Clear override (this screen) removes the patch for the current screen. Remove experience deletes that key and its overrides.
-
Preview — The preview shows the merged result (default HTML + overrides for the selected experience). The preview toolbar can switch segment experience the same way as Editing as in the sidebar, so you can QA each variant without publishing.
-
Smart offers — Open the Smart offers section to define rules evaluated on the live unsubscribe URL (after any A/B test assignment). First matching rule wins. Each rule can include:
-
Conditions — All conditions on a rule must pass. You can combine fields such as page visits, times retained, order count, CLV, AOV, orders and revenue in the last 90 days, days since last order, pause state, and last action type. Context comes from Last Chance analytics and Shopify orders synced to Last Chance (not the Klaviyo API on each page load). If Shopify is not connected, order-based conditions will not behave usefully until you connect the app and orders are synced; behavior-only fields still work.
-
Outcome — Choose Default (no override) or one of your segment experience keys so subscribers who match the rule see that experience’s HTML overrides.
You must add at least one segment experience (override key) before you can assign outcomes in smart-offer rules. When you save or publish, the app validates that every outcome key exists in your segment experiences.
-
-
Analytics — To report on which experience subscribers first landed in during a date range, use Analytics → Segment experience (and optionally Smart offer rule ID under Advanced filters). See the Analytics guide.
Preview and drafts do not write production “page visit” analytics; only traffic on the public unsubscribe URL does. That keeps editor and email preview traffic out of retention metrics.
Using the Visual Editor
For more control over your page design:
- Click Edit Page in the header
- The GrapesJS visual editor opens
- Drag components from the left panel
- Click elements to edit their content
- Use the style panel to adjust CSS properties
- Click Save when done (or press
Ctrl+S)
Available Components
The visual editor includes custom components designed for unsubscribe pages:
| Component | Description |
|---|---|
| Stay Subscribed Button | Keeps the subscriber on your list |
| Unsubscribe Button | Processes the unsubscribe request |
| Pause Emails Button | Opens pause duration options |
| Pause Modal | Modal for selecting pause duration |
| Unsubscribe Reason Form | Collects feedback on why they're leaving |
| Paused Until Display | Shows when emails will resume |
Direct HTML/CSS Editing
For advanced customization:
- In the Settings sidebar, navigate to the HTML/CSS tab
- Edit the raw HTML and CSS directly
- Use template variables like
{{discount_code}}for dynamic content - Click Save as new Draft to preserve your changes
Step 4: Create a Discount Code
Offering a discount can significantly increase subscriber retention. Last Chance makes it easy to create and display discount codes.
Creating a Discount Code in Last Chance
- In the page editor, open the Settings sidebar
- Scroll to Discount Code section
- Click Create New Discount
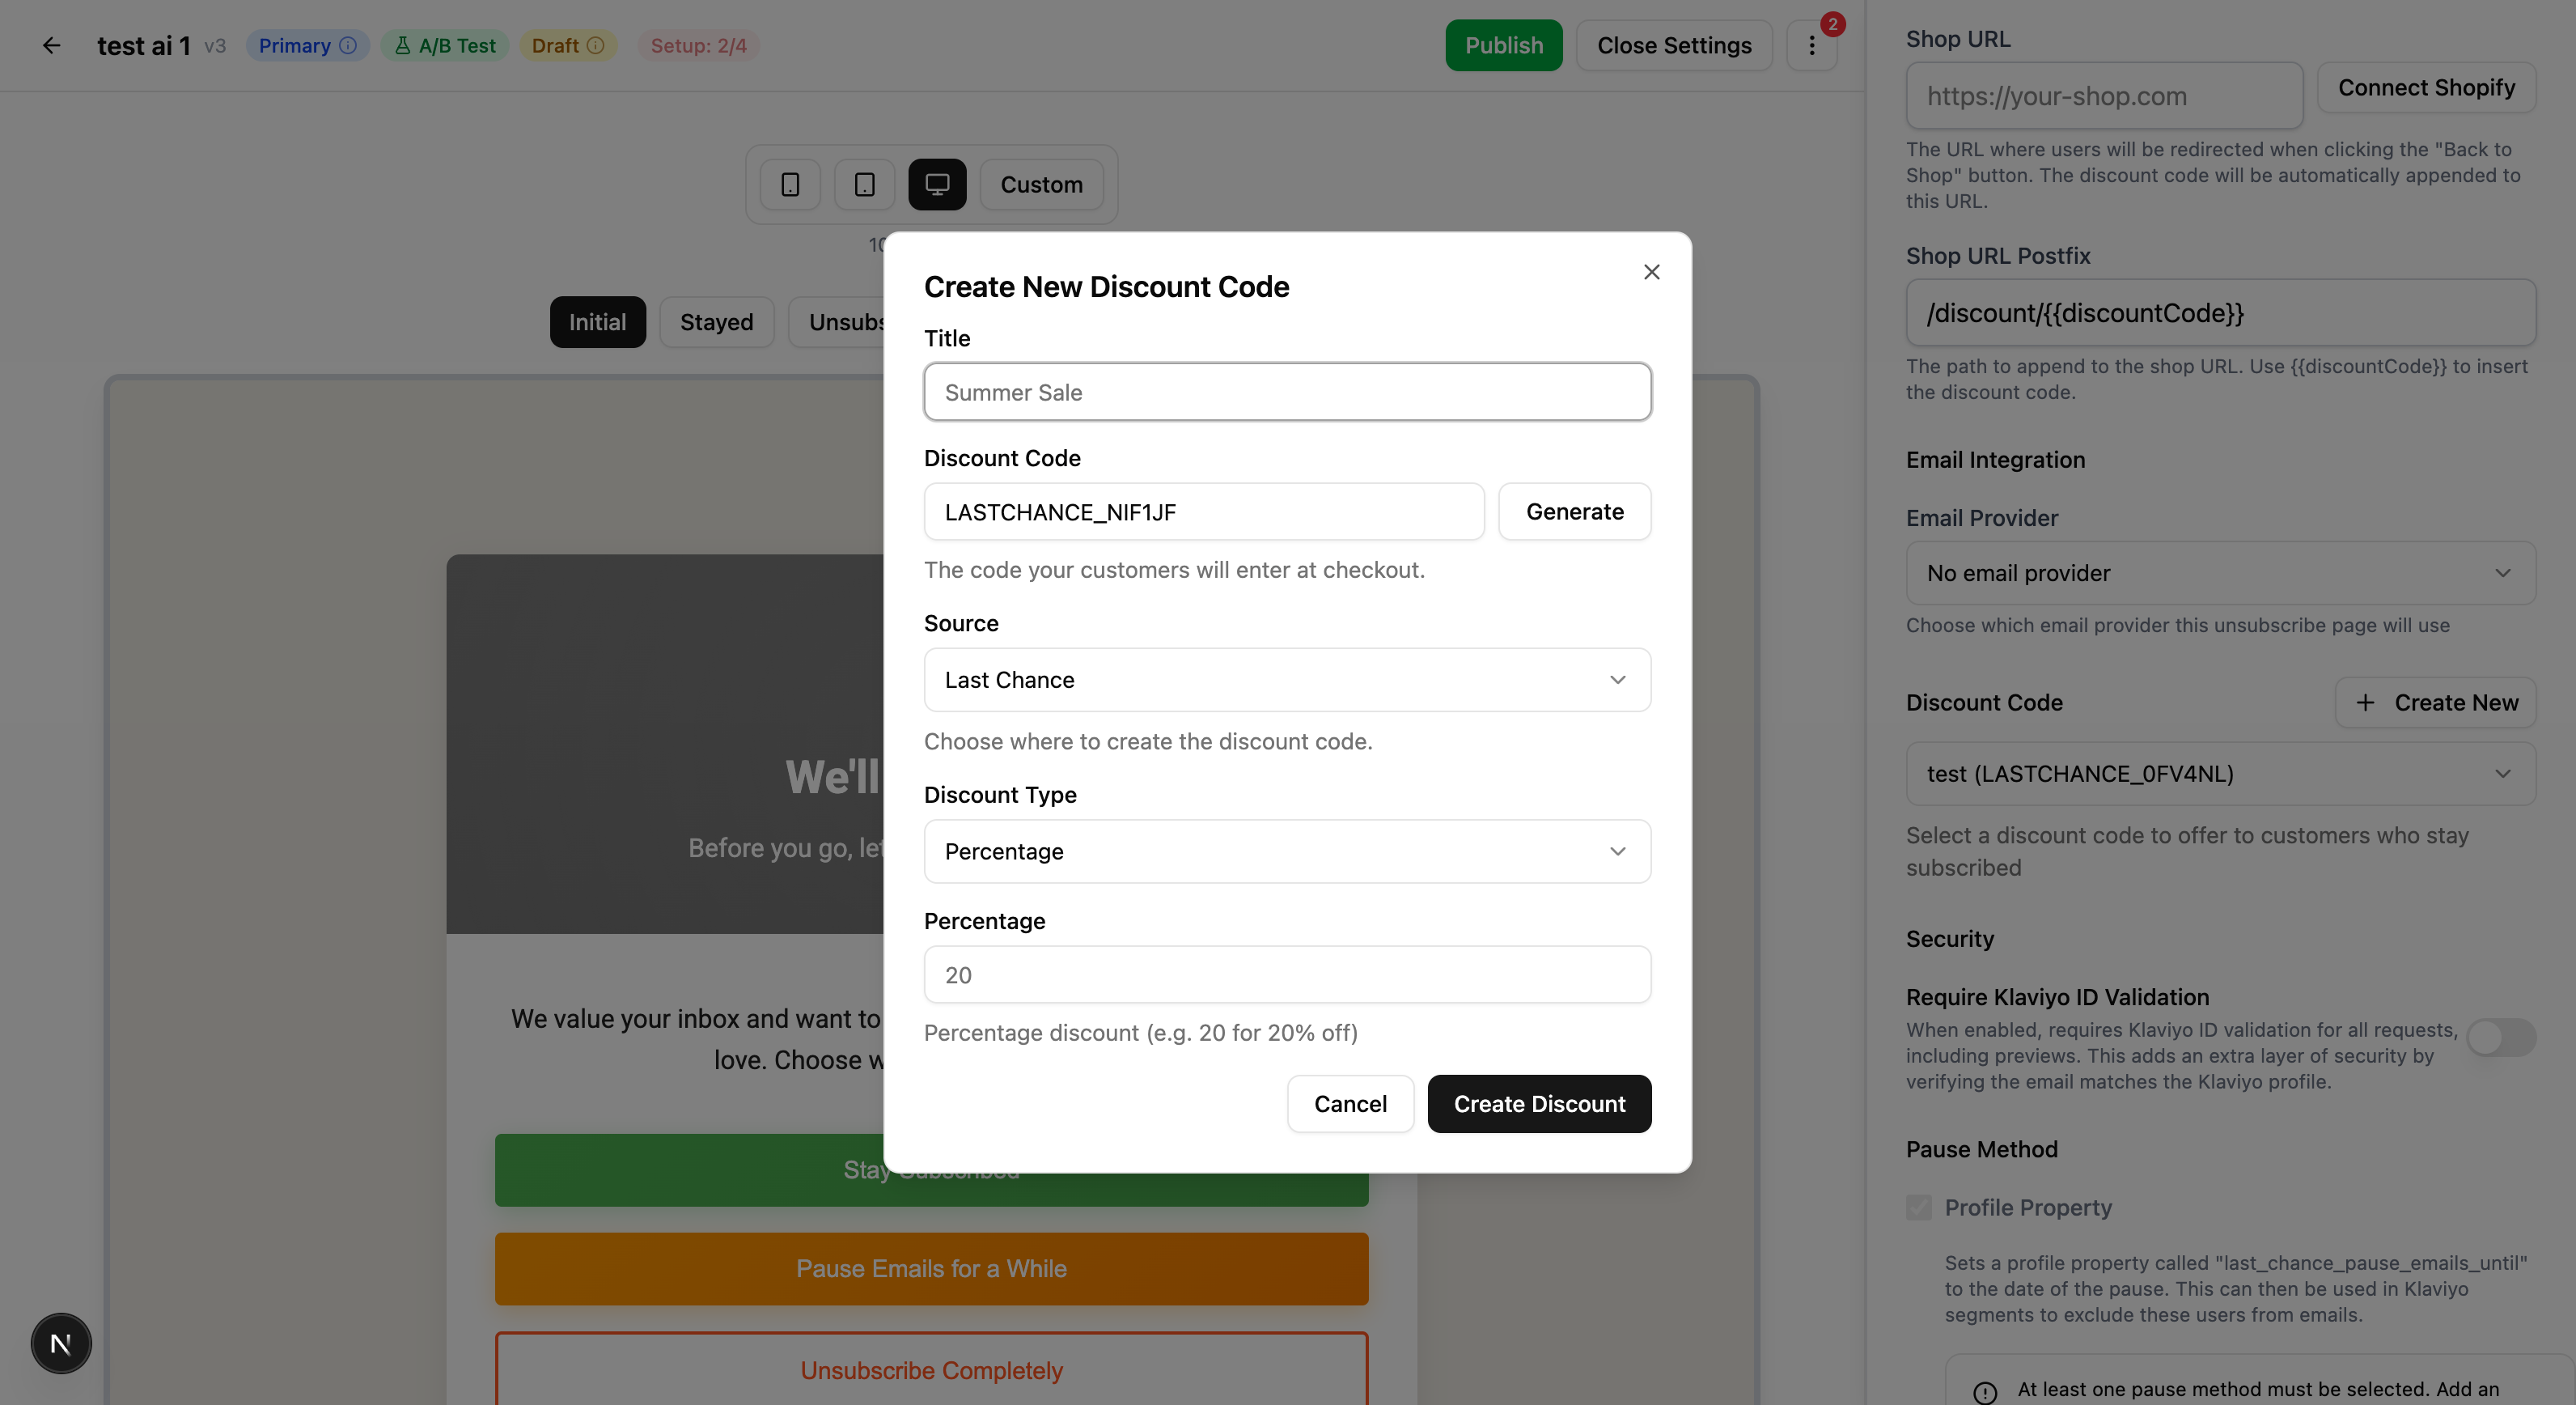
Fill in the discount details:
| Field | Description |
|---|---|
| Title | Internal name for the discount |
| Discount Code | The code subscribers will enter (or click "Generate" for a unique code) |
| Source | Where to store the code (Local Database) |
| Discount Type | Percentage or Fixed Amount |
| Discount Value | The discount amount (e.g., 20 for 20% off) |
| Start Date | When the discount becomes active |
| Limit to one use | Whether each customer can only use it once |
- Click Create Discount
- The discount will automatically be linked to your page
Important: Mirror the Discount in Your E-commerce Platform
⚠️ Critical Step: For the discount to work at checkout, you must create a matching discount code in your e-commerce platform (Shopify, WooCommerce, etc.) with the exact same code.
In your e-commerce platform:
- Navigate to your discount codes section
- Create a new discount with the exact same code you created in Last Chance
- Configure the same discount type and value
- Set any additional restrictions (minimum purchase, product exclusions, etc.)
Displaying the Discount
The discount code will automatically appear on your unsubscribe page using the {{discount_code}} template variable. You can customize how it's displayed in the visual editor.
Step 5: Publish Your Page
Once you're happy with your page, it's time to publish it.
Save Your Changes
- If you have unsaved changes, click Save as new Draft
- Your changes are saved as a new version
Publish the Version
- Click the Publish Version button in the header
- The page status changes from "Draft" to "Live"
- Your page is now visible to subscribers
Version History
Every time you save, a new version is created. You can:
- View all versions from the More Options (⋮) → Versions menu
- Preview any previous version
- Revert to a previous version if needed
Step 6: Set Up Klaviyo Unsubscribe Hosted Page
The final step is to configure a Klaviyo unsubscribe hosted page that redirects unsubscribes to your Last Chance page.
Quick Setup
- Navigate to Settings → Email Providers → Klaviyo → Unsubscribe Hosted Page Setup in your dashboard
- Follow the interactive step-by-step guide to complete the setup
- The guide provides personalized HTML code with your unique team ID (requires authentication)
📖 For detailed instructions and troubleshooting, see the Klaviyo Unsubscribe Hosted Page Setup Guide
Email templates: Use Klaviyo’s unsubscribe tag (or personalization menu) in campaigns and flows so clicks use your consent / hosted page flow. Step-by-step for tags and preference links: Klaviyo unsubscribe and preference links in emails.
Overview
The Klaviyo unsubscribe hosted page setup allows you to:
- Automatically redirect all unsubscribe requests to your Last Chance page
- Pass through all tracking parameters (email, Klaviyo ID, campaign ID, flow ID, etc.)
- Avoid updating individual unsubscribe links in email templates
The setup guide in your dashboard includes:
- Step-by-step instructions with screenshots
- Personalized HTML code (with your team ID)
- Copy-to-clipboard functionality for easy setup
Step 7 (Recommended): Klaviyo preference center hosted page
We recommend that subscribers who click manage preferences in Klaviyo land on your Last Chance preferences screen (not only the main unsubscribe entry). Add a second hosted page that uses the same script with data-entry="preferences", then assign it in Klaviyo’s consent settings for the preference-center flow.
See the Klaviyo Preference Center Setup Guide for full steps. Your dashboard (Settings → Email Providers → Klaviyo) includes a second HTML snippet and setup notes. Add manage preferences links in templates as described in Klaviyo unsubscribe and preference links in emails.
Setup Checklist
Use the built-in checklist to track your progress:

| Step | Description | Status |
|---|---|---|
| Customize Page | Design and customize your unsubscribe page | ☐ |
| Add Discount Code | Set up a discount code to encourage subscribers to stay | ☐ |
| Publish Page | Make your page live and visible to subscribers | ☐ |
| Set Up Klaviyo Unsubscribe Hosted Page | Configure Klaviyo unsubscribe hosted page to redirect to your Last Chance page | ☐ |
| Preference center (recommended) | Second hosted page for manage-preferences → Last Chance preferences | ☐ |
Access the checklist by clicking on the Setup Progress badge in the page editor header.
Next Steps
Congratulations! You've successfully set up your first Last Chance unsubscribe page. Here's what to do next:
- Monitor Analytics - Track how subscribers interact with your page → Analytics Guide
- Invite Team Members - Collaborate with your team → Team Management Guide
- Manage Billing - Understand your subscription and billing → Billing & Account Guide
- Optional: Branded subdomain - Platform subdomain on Scale+; custom domain on Advanced+ → Branded Unsubscribe Subdomain Guide
Troubleshooting
Page Not Showing for Subscribers
- Ensure your page is Published (not Draft)
- Verify the Klaviyo unsubscribe hosted page is configured correctly
- Check that your Klaviyo integration is connected
Discount Code Not Working
- Confirm you created a matching code in your e-commerce platform
- Verify the code is active and hasn't expired
- Check for any restrictions that might prevent use
Klaviyo Unsubscribe Hosted Page Not Working
- Verify the unsubscribe hosted page HTML code was copied correctly
- Ensure the unsubscribe hosted page is set as the default unsubscribe page in Klaviyo settings
- Check that your Last Chance page is published and active
For additional help, contact support at support@yourlastchance.app.